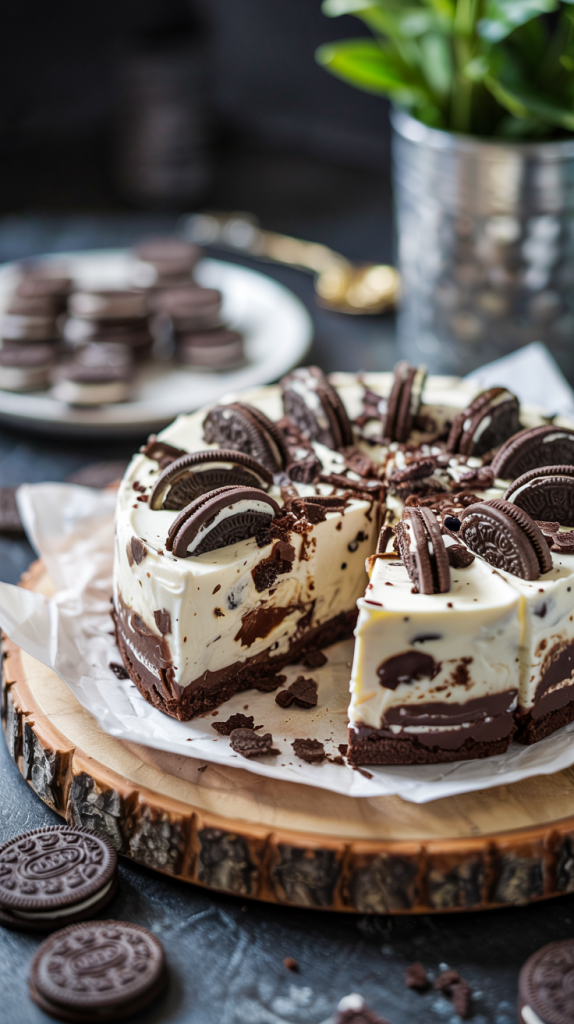
Craving a sweet, creamy dessert without the hassle of baking? A no bake Oreo cheesecake might be your perfect solution. This dessert combines the irresistible crunch of Oreo cookies with the smooth richness of cheesecake filling, all without ever turning on the oven. Perfect for any occasion, it’s a crowd-pleaser that’s incredibly easy to make. No need to worry about complicated steps or waiting for your oven to preheat; this cheesecake requires minimal effort and delivers maximum flavor. With a crunchy Oreo crust, a rich, creamy filling, and a sprinkle of crushed Oreos on top, it’s sure to satisfy anyone’s sweet tooth. Make it ahead for a stress-free dessert or whip it up last-minute for an impromptu treat—either way, this no-bake Oreo cheesecake is always a winning choice.
Why You Love This Recipe?

This no-bake Oreo cheesecake is a dream come true for anyone who loves creamy, indulgent desserts without the fuss. It’s incredibly easy to make, requires no baking, and delivers all the flavors you crave. The Oreo crust adds the perfect crunch, while the rich cheesecake filling is smooth and velvety. Best of all, it’s versatile—whether you’re preparing it for a special occasion or just a quick treat, it always impresses. The combination of textures and the simplicity of the recipe make it a go-to dessert for both beginners and seasoned bakers alike. Plus, who can resist the iconic flavor of Oreos? This recipe is a guaranteed crowd-pleaser and one you’ll keep coming back to again and again.
Ingredients for No Bake Oreo Cheesecake:
- 24 Oreo cookies (plus extra for topping)
- 5 tbsp unsalted butter, melted
- 2 cups cream cheese, softened
- 1 cup powdered sugar
- 1 tsp vanilla extract
- 2 cups heavy whipping cream
- 1/4 cup powdered sugar (for the whipped cream)
- 1/4 cup mini chocolate chips (optional, for garnish)
Equipment Needed
- 9-inch springform pan or regular cake pan
- Food processor or zip-top bag and rolling pin (for crushing the Oreos)
- Mixing bowls (for the crust and filling)
- Electric mixer or hand whisk (for whipping the cream)
- Rubber spatula (for mixing)
- Measuring cups and spoons
- Spoon or small offset spatula (for smoothing the cheesecake filling)
How To Make This Recipe?

1. Prepare the Oreo Crust
Start by crushing the Oreo cookies for the crust. You can do this by placing them in a food processor and pulsing until they are finely crushed. If you don’t have a food processor, put the Oreos in a zip-top bag and crush them with a rolling pin. Aim for a fine, sand-like texture. Once crushed, transfer the crumbs to a mixing bowl.
Add the melted butter to the cookie crumbs and stir until the mixture holds together when pressed. This will be your crust. Press the mixture into the bottom of a 9-inch springform pan, ensuring it’s evenly distributed. Use the back of a spoon to gently press it down for a firm, compact crust. Place the crust in the refrigerator to set while you prepare the cheesecake filling.
2. Prepare the Cheesecake Filling
In a large mixing bowl, beat the softened cream cheese with an electric mixer on medium speed until it’s smooth and creamy. This step ensures there are no lumps in your filling. Add the powdered sugar and vanilla extract to the cream cheese, and continue mixing until everything is fully combined. The mixture should be thick but smooth.
In a separate bowl, whip the heavy cream with 1/4 cup powdered sugar until stiff peaks form. This will give your cheesecake filling a light and airy texture. Gently fold the whipped cream into the cream cheese mixture, using a rubber spatula. Be careful not to deflate the whipped cream—folding it in preserves the lightness.
3. Assemble the Cheesecake
Take the Oreo crust out of the refrigerator and spoon the cheesecake filling onto the crust. Use a rubber spatula to spread the filling evenly, smoothing the top to make it look neat. You can also create a swirl pattern on the surface for a decorative touch. Once the filling is evenly spread, gently tap the pan on the counter to release any air bubbles that may have formed.
4. Chill the Cheesecake
Place the cheesecake in the refrigerator for at least 4 hours, or overnight if possible. This time allows the filling to set and firm up, so the cheesecake can be sliced easily. The longer it chills, the better the flavor and texture will be.
5. Garnish and Serve
Before serving, remove the cheesecake from the springform pan. You can gently run a knife around the edge to help release the sides if needed. Top the cheesecake with crushed Oreos, mini chocolate chips, or any other topping you like. For extra richness, drizzle some chocolate or caramel sauce on top.
6. Optional: Add a Layer of Chocolate Ganache
For an extra indulgent touch, consider adding a layer of chocolate ganache on top of the cheesecake. To make the ganache, heat 1/2 cup of heavy cream in a small saucepan over medium heat until it begins to simmer. Remove from heat and stir in 4 ounces of chopped chocolate (dark, milk, or semi-sweet, depending on your preference). Stir until the chocolate is fully melted and the mixture is smooth.
Allow the ganache to cool slightly before pouring it over the chilled cheesecake. Spread it evenly with a spatula, and return the cheesecake to the fridge to set for an additional 30 minutes to 1 hour. This extra layer of chocolate adds a rich, glossy finish and takes the dessert to the next level.
7. Customize Your Toppings
While crushed Oreos make an excellent topping, feel free to get creative! Some popular alternatives include:
- Fresh berries (strawberries, raspberries, or blueberries) for a burst of freshness.
- Whipped cream for a light and airy contrast to the dense cheesecake.
- Crushed candy bars or nuts (like pistachios or almonds) for a crunchy texture.
- A drizzle of caramel or fruit syrup to enhance the flavor profile.
Top your cheesecake right before serving to keep the toppings fresh and vibrant.
8. Slice and Serve with Style
Once the cheesecake has set completely and the toppings are added, it’s time to slice and serve. Use a sharp knife to cut clean slices. To ensure clean cuts, dip the knife in hot water between each slice and wipe it off with a cloth. This simple step will help you achieve smooth, professional-looking slices.
Serve the cheesecake with a side of whipped cream or a cup of coffee for an even more delightful treat. Pairing this dessert with a warm beverage brings out the richness of the cheesecake, making it perfect for after dinner or special occasions.
9. Store Leftovers Properly
If you have any leftovers (although this dessert is so delicious, that’s unlikely!), store the cheesecake in an airtight container in the refrigerator. It should stay fresh for up to 3 days. If you prefer, you can also freeze individual slices. Wrap each slice tightly in plastic wrap, place it in a freezer-safe bag or container, and freeze for up to 1 month. Thaw the slices in the fridge overnight for a quick and easy treat whenever you’re craving it.
10. Make Ahead for Special Occasions
No-bake Oreo cheesecake is an excellent make-ahead dessert. If you plan to serve it at a party or family gathering, prepare it a day or two ahead of time. The cheesecake holds up well and the flavors continue to deepen as it sits in the refrigerator. Just remember to garnish with fresh toppings or ganache right before serving for the best presentation.
FAQs
1. Can I make this cheesecake without a springform pan? Yes, you can use a regular 9-inch round cake pan instead of a springform pan. However, you may find it a little more challenging to remove the cheesecake from the pan. To make it easier, line the bottom of the pan with parchment paper so you can lift the cheesecake out after it has set.
2. How long does it take for the cheesecake to set? It takes at least 4 hours for the cheesecake to set in the refrigerator, but for the best results, chilling it overnight is recommended. This allows the filling to firm up properly, making it easier to slice and serve.
3. Can I substitute the heavy cream with something else? Heavy cream is key to achieving the creamy texture of the filling, but you can substitute it with whipped topping if you prefer a lighter option. Keep in mind, using whipped topping may slightly change the flavor and texture.
4. Can I freeze the no-bake Oreo cheesecake? Yes, you can freeze it! To freeze, wrap the cheesecake tightly in plastic wrap and then place it in a freezer-safe container or bag. When ready to serve, thaw it in the refrigerator for several hours or overnight.
5. Can I add other mix-ins to the filling? Definitely! You can add other ingredients to the filling, such as crushed Oreos, chocolate chips, or even a swirl of peanut butter or caramel sauce for extra flavor. Just make sure to gently fold them in so you don’t deflate the whipped cream.
Conclusion
No-bake Oreo cheesecake offers a simple and delicious solution for satisfying your sweet cravings without the hassle of baking. With a creamy filling, crunchy Oreo crust, and endless customization options, this dessert is perfect for any occasion. Whether you enjoy it as a quick treat or a show-stopping centerpiece for a special event, it’s bound to impress. With minimal effort and maximum flavor, this cheesecake is one recipe you’ll come back to time and time again. Happy baking (or should we say, no-baking)!
Related Recipes