
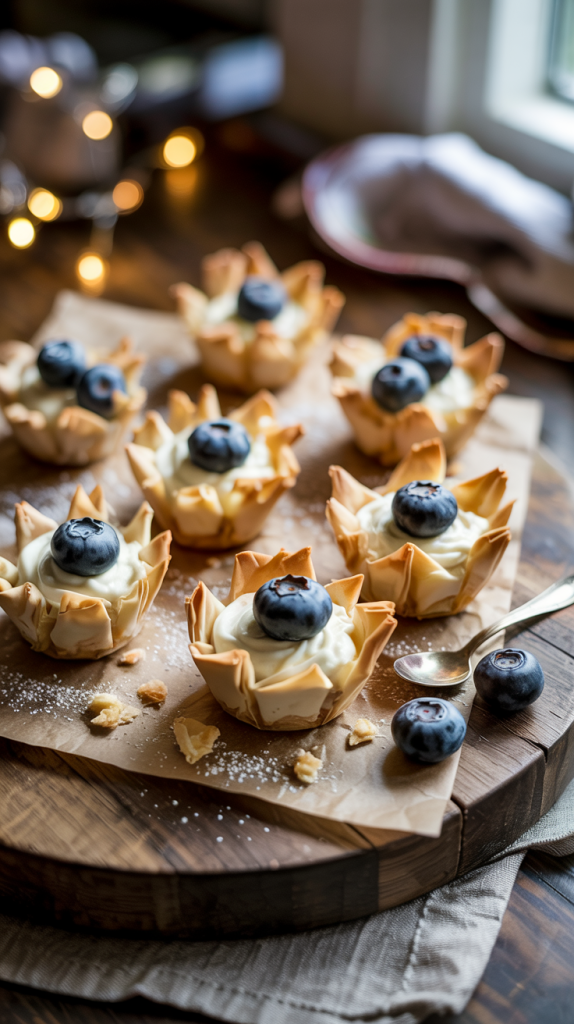
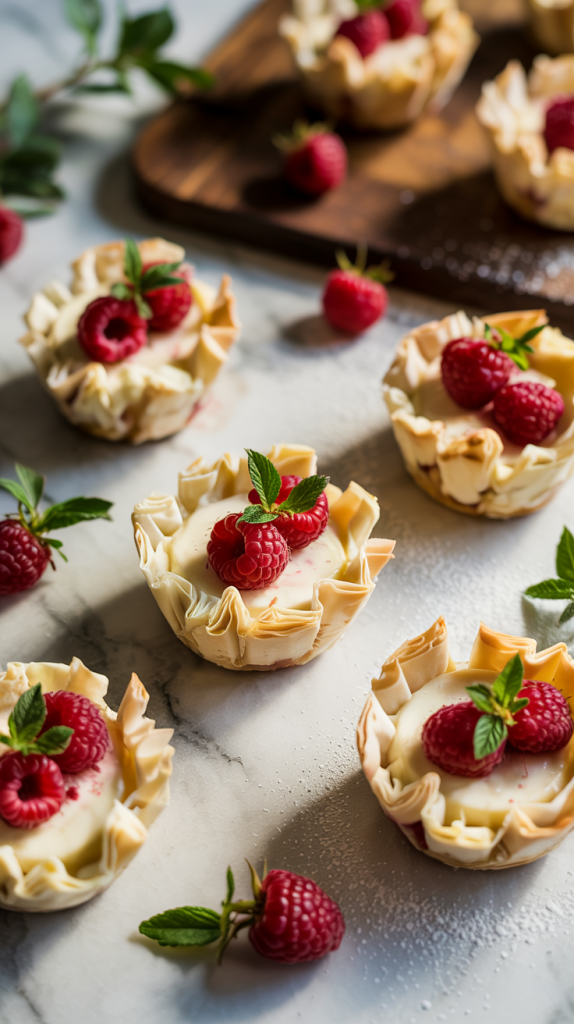
Dessert doesn’t have to be complicated to impress. These no bake cheesecake phyllo cups prove that indulgence can be effortless. Crisp, golden phyllo shells cradle a creamy cheesecake filling that tastes like it took hours to prepare. In reality, this treat comes together in just minutes, no oven required. Perfect for last-minute gatherings or midweek cravings, these mini desserts deliver big flavor in every bite.
Each cup offers the perfect balance of crunch and creaminess, topped with fresh berries or a drizzle of chocolate for a finishing touch. Kids love them, adults ask for seconds, and hosts breathe a sigh of relief at the simplicity. These phyllo cups also bring elegance to any dessert spread without the stress. Impress guests, satisfy a sweet tooth, or enjoy a quiet moment with one of these creamy bites. With minimal effort and maximum flavor, this dessert becomes an instant favorite.
Ingredients
- 1 package (15 count) mini phyllo shells (store-bought, pre-baked and frozen or refrigerated)
- 8 oz cream cheese (softened to room temperature)
- 1/4 cup powdered sugar
- 1/2 tsp vanilla extract
- 1/2 cup heavy whipping cream
- Fresh berries (strawberries, blueberries, raspberries, or a mix)
- Optional toppings:
- Honey or chocolate drizzle
- Crushed graham crackers
- Lemon zest or mint leaves for garnish
Kitchen Tools:
- Hand mixer or stand mixer – for whipping the cream and blending the cheesecake filling
- Mixing bowls – one medium for the cream cheese mixture, one small for whipping cream
- Rubber spatula or spoon – for folding ingredients together
- Piping bag or zip-top bag – for filling the phyllo cups neatly
- Small spoon – for adding toppings and final touches
- Serving tray or plate – to present the finished cheesecake cups
- Zester or grater (optional) – for adding lemon zest as garnish
Step By Step Guide Of No Bake Cheesecake Phyllo Cups
Step 1: Gather All Ingredients and Tools
Before diving in, get everything out and ready. Lay out your mini phyllo shells, cream cheese, powdered sugar, vanilla extract, heavy whipping cream, and your choice of toppings. Pull out your hand mixer, mixing bowls, piping bag, and any optional garnishes. This makes the process smooth and enjoyable, just like a proper mise en place in a professional kitchen.
Step 2: Soften the Cream Cheese
Place the cream cheese on the counter for at least 30 minutes to bring it to room temperature. Softened cream cheese blends more easily, creating that silky, lump-free texture we’re aiming for in the filling. A cold block will only fight your mixer and ruin the consistency.
Step 3: Whip the Heavy Cream
In a cold mixing bowl, pour in the heavy whipping cream. Using a hand mixer or stand mixer on medium-high speed, whip the cream until it forms stiff peaks. This means the cream will hold its shape when you lift the beaters. Set this aside—it’s the secret to that airy cheesecake texture.
Step 4: Blend Cream Cheese, Sugar, and Vanilla
In another bowl, beat the softened cream cheese until smooth. Add the powdered sugar and vanilla extract. Continue mixing until everything is creamy and fully combined. No lumps. No shortcuts. The result should be a velvety base with just a touch of sweetness and a rich vanilla aroma.
Step 5: Fold in the Whipped Cream
Gently fold the whipped cream into the cream cheese mixture using a rubber spatula. Avoid overmixing. Use a light hand to preserve the airiness. The goal is a light, mousse-like cheesecake filling that will melt in your mouth, not weigh it down.
Step 6: Transfer Filling to a Piping Bag
Spoon the finished cheesecake filling into a piping bag fitted with a round or star tip. No piping bag? No problem. Use a zip-top bag and snip off one corner. This method keeps things neat and fills the shells with elegance and precision—just like a pastry chef would.
Step 7: Fill the Phyllo Cups
Arrange the phyllo shells on your serving tray. Carefully pipe the cheesecake filling into each shell until full. Don’t rush—take your time to make each one a little masterpiece. These golden cups deserve nothing less.
Step 8: Add Your Toppings
Now comes the fun part. Top each filled phyllo cup with a fresh berry, a drizzle of chocolate, or a sprinkle of crushed graham crackers. Want a pop of color? Add a sliver of mint or a curl of lemon zest. This is where your creativity shines.
Step 9: Chill Before Serving
Place the tray in the fridge for at least 30 minutes. This allows the filling to firm up slightly and lets the flavors come together beautifully. Serve cold for the best texture and flavor.
Step 10: Serve and Impress
Take your no bake cheesecake phyllo cups out of the fridge just before serving. Arrange them on a pretty platter, and let your guests indulge. Each bite delivers creamy, crunchy, and fruity perfection. Watch them disappear faster than you made them.
Serve Tips
1. Serve Chilled, Not Frozen
Keep the phyllo cups refrigerated until just before serving. Serve them cold for the best texture—creamy filling and crisp shell. Freezing makes the shells soggy after thawing, so stick to the fridge.
2. Use a Beautiful Platter
Presentation matters. Use a tiered dessert stand or a rustic wooden board for a charming, elegant display. Arrange them in a circular or alternating pattern for visual appeal.
3. Garnish Just Before Serving
Add toppings like mint leaves, lemon zest, or chocolate drizzle right before bringing them out. This keeps everything fresh and prevents soggy toppings.
4. Pair with Coffee or Bubbly
These light, creamy bites go perfectly with espresso, herbal tea, or even sparkling wine. Offer a drink pairing to elevate the dessert experience.
5. Keep Extra Toppings on the Side
Set up a mini toppings bar with extra berries, honey, crushed nuts, or sauces so guests can customize their own.
FAQ
1. Can I make these cheesecake phyllo cups ahead of time?
Yes, you can make them up to 24 hours in advance. Keep them covered in the refrigerator to maintain freshness. Add toppings just before serving to keep the shells crisp.
2. Where can I find mini phyllo shells?
Most grocery stores carry them in the freezer section, usually near the puff pastry or frozen desserts. Look for brands like Athens or store-brand versions labeled “phyllo cups” or “mini fillo shells.”
3. Can I use Cool Whip instead of heavy cream?
Yes, Cool Whip is a convenient substitute for whipped cream. Just fold it gently into the cream cheese mixture. It adds sweetness and keeps the recipe quick and easy.
4. How do I prevent the phyllo cups from getting soggy?
Keep the filling and shells separate until you’re ready to assemble. Fill them shortly before serving and avoid overly wet toppings like juicy fruits or syrups until the last minute.
5. Are there any flavor variations I can try?
Absolutely! Add lemon zest to the filling for a citrus twist, mix in melted chocolate for a mocha flavor, or swirl in peanut butter for a richer dessert. The base is flexible and perfect for creativity.
Conclusion
No Bake Cheesecake Phyllo Cups are the kind of dessert that brings joy without stress. They’re simple, elegant, and full of flavor. Each bite combines creamy cheesecake with the satisfying crunch of golden phyllo—a match made in dessert heaven. Whether you’re serving a crowd or treating yourself to something sweet, these mini delights check all the boxes: easy, beautiful, and delicious. Once you try them, you’ll find any excuse to make them again.
Related Recipes