Have you ever wondered how to make your favorite candy last longer while keeping its flavor and crunch? Freeze drying candy with a dehydrator is a simple trick that can transform your sweets into a fun, crunchy treat that stays fresh for months.
If you want to learn how to do this right at home, you’re in the right place. In this guide, you’ll discover easy steps and insider tips to freeze dry candy using your dehydrator, turning your snacks into a new favorite.
Ready to impress your taste buds and never waste candy again? Let’s dive in!
Choosing The Right Candy
Choosing the right candy is the first step to successful freeze drying with a dehydrator. Not all candies react the same to freeze drying. Some become crunchy and light, while others may melt or turn sticky. Picking the right candy ensures a tasty, enjoyable result.
Think about texture and ingredients. Candies with a lot of water freeze dry better. Those with high sugar or fat content might not work well. Knowing which candies freeze dry well saves time and effort.
Best Candy Types For Freeze Drying
Hard candies like lollipops and peppermints freeze dry very well. They become crunchy and keep their flavor. Gummies and jelly candies also work nicely. They turn airy and light after freeze drying.
Marshmallows are a top choice too. They become crispy and melt in your mouth. Fruit snacks and certain sour candies are good options. They hold their shape and taste after drying.
Avoiding Candies That Don’t Freeze Dry Well
Chocolate is tricky. It often melts and clumps instead of drying. Candies with high fat, like caramels and peanut butter cups, do not freeze dry well. They become sticky or gooey.
Chewy candies like taffy or nougat lose their texture. Hard sugar shells on chocolates may crack or crumble. Avoid candies with fillings that melt or spoil during freeze drying.
Preparing Candy For Freeze Drying
Preparing candy for freeze drying is a key step in the process. Proper preparation helps keep the candy’s shape and flavor during freeze drying. It also ensures even drying and better texture.
Taking time to prepare candy correctly can improve the final product. This section explains how to cut, arrange, and pre-freeze candy before using a dehydrator.
Cutting And Arranging Candy Pieces
Cut candy into small, even pieces. This helps the freeze drying process work well. Avoid pieces that are too thick or too thin. Thick pieces take longer to dry. Thin pieces may break easily.
Arrange the candy pieces on the dehydrator trays in a single layer. Leave space between pieces. This allows air to flow freely. Proper air circulation helps dry the candy evenly.
Do not stack candy pieces. Stacking traps moisture and causes uneven drying. Make sure each piece gets enough air.
Pre-freezing Tips
Place the trays with candy in the freezer before freeze drying. Freeze the candy for at least 2 to 4 hours. This step helps keep the candy solid during drying.
Freezing candy first stops melting and sticking in the dehydrator. It makes the freeze drying process faster and smoother. Avoid thawing candy before starting the dehydrator.
Use a freezer-safe tray or parchment paper to prevent sticking. Frozen candy pieces are easier to handle and stay intact during drying.
Setting Up Your Dehydrator
Setting up your dehydrator correctly is key to freeze drying candy successfully. It ensures even drying and preserves the candy’s flavor and texture. The right temperature and equipment help remove moisture without melting or damaging the candy.
Follow simple steps to prepare your dehydrator for freeze drying candy. This makes the process smooth and improves your final results.
Recommended Temperature Settings
Set your dehydrator to a low temperature, around 130°F (54°C). This temperature dries candy slowly without causing melting. High heat can ruin the candy’s shape and taste.
Keep the temperature steady throughout the drying process. Avoid opening the dehydrator often to maintain consistent heat and airflow.
Using Proper Trays And Accessories
Choose trays with non-stick surfaces or use parchment paper. This prevents candy from sticking and breaking during drying.
Arrange candies in a single layer with space between each piece. Proper airflow around each candy helps even drying.
Use mesh or perforated trays if possible. They allow better air circulation and speed up drying.
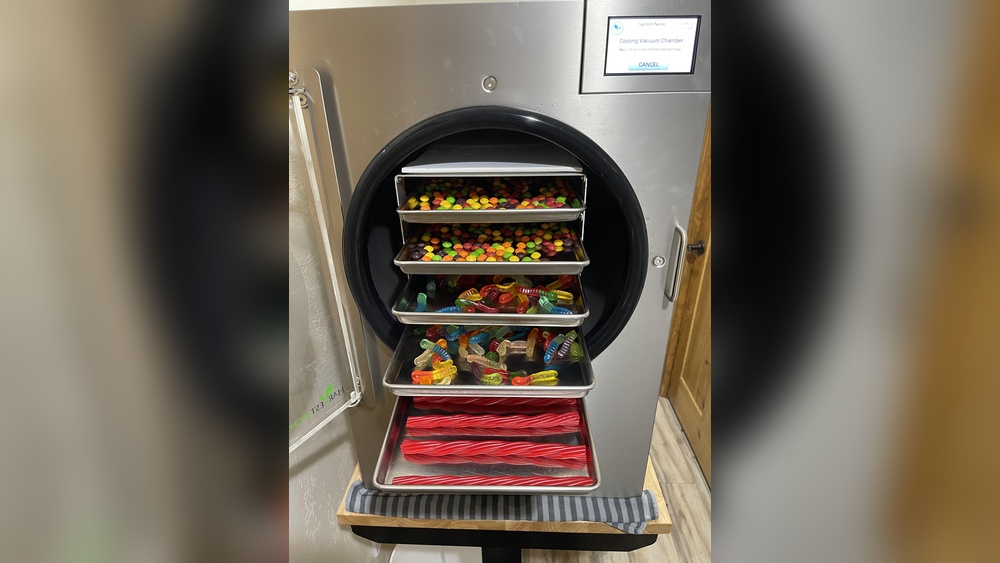
Credit: www.reddit.com
Freeze Drying Process Step-by-step
Freeze drying candy with a dehydrator is a simple process. It removes moisture while keeping candy shape and flavor. Follow these steps carefully for the best results. Each stage is important to make crunchy, tasty freeze-dried candy.
Loading Candy Into The Dehydrator
Start by spreading candy pieces evenly on the dehydrator trays. Avoid overlapping to allow air flow around each piece. Small candies like gummies or chocolate chips should be placed separately. Use parchment paper if candy is sticky. This prevents pieces from sticking to trays. Proper spacing helps candy dry evenly and fast.
Monitoring And Adjusting Drying Time
Set the dehydrator to a low temperature, around 135°F (57°C). Check candy every few hours. Drying time varies based on candy type and size. Soft candies may take 12 to 24 hours. Hard candies might need less time. Remove pieces that feel dry and crisp. If some are still soft, continue drying. Adjust time to avoid over-drying or burning. Patience ensures perfect freeze-dried candy texture.
Storing And Using Freeze-dried Candy
Freeze-dried candy offers a unique crunchy texture and intense flavor. Proper storage keeps the candy fresh and tasty for a long time. Using the candy in creative ways makes snacking fun and exciting.
Best Storage Methods
Store freeze-dried candy in airtight containers. Use glass jars or sealed plastic bags to block air and moisture. Keep containers in a cool, dark place to prevent melting or sticky candy. Avoid storing near heat or sunlight. Label containers with the freeze-dry date to track freshness. Proper storage preserves crunchiness and flavor for months.
Creative Ways To Enjoy Freeze-dried Candy
Use freeze-dried candy as a topping for ice cream or yogurt. Crush the candy to add a crunchy texture to baked goods. Mix pieces into trail mix for a sweet surprise. Add freeze-dried candy to hot chocolate or coffee for a flavored twist. Enjoy it straight from the container for a quick snack that stays crisp longer than regular candy.

Credit: www.walmart.com
Credit: www.walmart.com
Frequently Asked Questions
What Is Freeze Drying Candy With A Dehydrator?
Freeze drying candy with a dehydrator removes moisture by freezing and drying slowly. This keeps the candy’s shape and flavor. It makes candy light and crunchy.
How Long Does It Take To Freeze Dry Candy?
Freeze drying candy usually takes 20 to 40 hours. The exact time depends on candy size and dehydrator settings. Patience is key for the best results.
Can All Types Of Candy Be Freeze Dried?
Most hard and chewy candies freeze dry well. Soft or creamy candies may not dry properly. Check your candy type before starting.
What Temperature Should I Set On My Dehydrator?
Set the dehydrator to about 125°F (52°C) for freeze drying candy. This temperature helps freeze dry without melting candy. Follow your dehydrator’s manual for best advice.
How Do I Store Freeze Dried Candy?
Store freeze dried candy in airtight containers or vacuum bags. Keep them in a cool, dry place to stay fresh. Proper storage keeps candy crunchy longer.
Conclusion
Freezing candy with a dehydrator is simple and fun. You just need patience and the right steps. The candy stays tasty and crunchy after freeze drying. It saves the candy for a long time without losing flavor. Try this method to enjoy your favorite sweets anytime.
Keep your dehydrator clean and follow the instructions well. Your homemade freeze-dried candy will impress family and friends. Give it a shot and enjoy a new way to treat yourself!