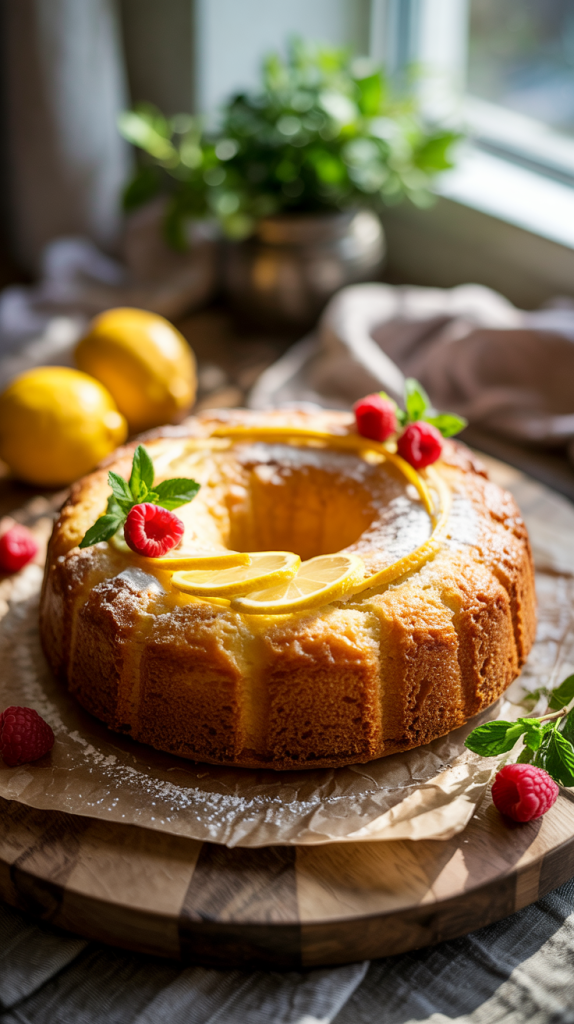
Fresh citrus meets rich creaminess in a dessert that never disappoints. Lemon cream cheese pound cake brings a bright pop of flavor to a buttery, dense crumb. Each bite delivers a balance of sweet, tangy, and smooth that feels like sunshine wrapped in a slice. The bold lemon zest cuts through the richness in the best way, keeping things light without losing that signature pound cake indulgence. This recipe stands out for its simplicity and crowd-pleasing charm. Friends ask for seconds. Families request it for birthdays, brunches, and holidays. The cream cheese adds moisture and a slight tang that plays beautifully against the lemon’s zing. No glaze required—though a drizzle never hurts. This cake doesn’t just taste good, it smells like a summer morning and feels like home. Perfect for those moments that call for a little something extra without much fuss. Let’s bake some joy.
Ingredients for Lemon Cream Cheese Pound Cake
For the Cake:
- 1 ½ cups (3 sticks) unsalted butter, softened
- 1 (8 oz) package cream cheese, softened
- 2 ¾ cups granulated sugar
- 6 large eggs, room temperature
- 3 cups all-purpose flour
- ½ teaspoon baking powder
- ½ teaspoon salt
- 1 tablespoon fresh lemon zest (from about 2 lemons)
- 2 tablespoons fresh lemon juice
- 1 teaspoon vanilla extract
Optional Lemon Glaze:
- 1 cup powdered sugar
- 2–3 tablespoons fresh lemon juice
- 1 teaspoon lemon zest (for extra zing)
Tools & Equipment
To make this cake smooth, fluffy, and golden, you’ll need the right kitchen tools. Here’s what to gather before you begin:
- Stand mixer or hand mixer – for creaming butter, cream cheese, and sugar until light and fluffy
- Mixing bowls – at least two: one for wet ingredients, one for dry
- Measuring cups and spoons – for accurate ingredient portions
- Microplane or zester – to zest fresh lemon cleanly and easily
- Citrus juicer or reamer – to extract fresh lemon juice without seeds
- Spatula – for scraping down the sides of the bowl and folding ingredients
- Sifter or fine mesh sieve – to aerate the flour (optional, but helpful)
- Standard 10-inch bundt pan or tube pan – for that classic pound cake shape
- Non-stick spray or butter and flour – to prep the pan and prevent sticking
- Cooling rack – allows the cake to cool evenly without moisture buildup
Step By Step Instructions
Step 1: Bring Ingredients to Room Temperature
Start by setting out the butter, cream cheese, and eggs at least 30 to 60 minutes before baking. Room temperature ingredients blend more smoothly and create better texture. Cold cream cheese or butter won’t cream properly, and cold eggs can make the batter curdle. This small prep step makes a big difference in the final cake.
Step 2: Preheat Oven and Prep the Pan
Set your oven to 325°F (163°C) and give it time to fully preheat. While that’s happening, grease a 10-inch bundt or tube pan generously using butter or non-stick spray. Dust lightly with flour, then tap out the excess. This ensures your cake comes out cleanly without sticking to the pan.
Step 3: Mix Butter and Cream Cheese
Place the softened butter and cream cheese in a large mixing bowl. Beat them together on medium speed for 2–3 minutes until the mixture turns smooth and creamy. Use a stand mixer if possible—it’ll save time and effort. Scrape down the sides of the bowl to ensure everything blends evenly.
Step 4: Add Sugar Gradually
Pour the sugar in slowly, about ½ cup at a time, while mixing on medium speed. Keep beating for another 4–5 minutes. The mixture should become fluffy and pale. This creaming process helps incorporate air, which gives your pound cake a soft, moist texture with a tender crumb.
Step 5: Add Eggs One at a Time
Crack in the eggs one by one. Beat well after each addition before adding the next. This helps the batter stay smooth and prevents it from separating. Once all six eggs are in, scrape down the sides of the bowl again and mix for another 30 seconds until fully combined.
Step 6: Add Lemon Zest, Juice, and Vanilla
Sprinkle in the fresh lemon zest, then pour in the lemon juice and vanilla extract. Mix until just blended. The zest gives a punch of bright lemon oil, while the juice adds tang and moisture. Vanilla balances the citrus and brings warmth to the flavor profile.
Step 7: Sift and Combine Dry Ingredients
In a separate bowl, whisk together the all-purpose flour, baking powder, and salt. If you’d like a lighter texture, sift the flour mixture using a fine-mesh sieve. This step prevents lumps and distributes the leavening evenly throughout the batter, giving your cake a balanced rise.
Step 8: Add Dry Ingredients in Batches
Turn your mixer to low speed and add the flour mixture gradually—about ½ cup at a time. Mix until just combined. Don’t overbeat the batter once the flour goes in. Overmixing will develop the gluten and lead to a dense or tough cake instead of a tender one.
Step 9: Pour Batter Into the Pan
Spoon the thick batter evenly into the prepared bund or tube pan. Tap the pan lightly on the counter to remove air bubbles and level the batter. Smooth the top with a spatula. This helps the cake bake evenly and rise without cracks or dips.
Step 10: Bake and Cool Completely
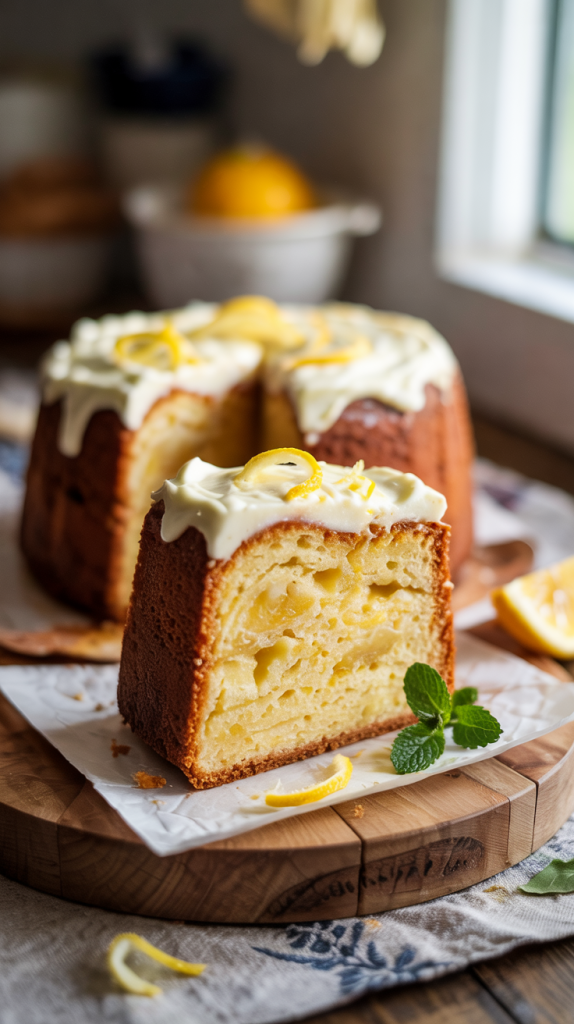
Place the pan in the center of your preheated oven. Bake for 75 to 85 minutes, or until a toothpick inserted into the thickest part comes out clean. Let the cake cool in the pan for 15–20 minutes, then turn it out onto a wire rack. Allow it to cool completely before slicing or glazing.
Storage Tips
Proper storage keeps your lemon cream cheese pound cake fresh, moist, and delicious for days. Here’s how to store it the right way:
Room Temperature (Up to 3 Days)
- Let the cake cool completely before storing.
- Wrap it tightly in plastic wrap or place it in an airtight cake container.
- Store in a cool, dry place away from direct sunlight and heat.
- Avoid slicing until ready to serve to prevent the cake from drying out.
Refrigerator (Up to 7 Days)
- Wrap the cake in plastic wrap and then in foil or store it in an airtight container.
- Keep it on a refrigerator shelf (not the door) for consistent temperature.
- Let slices come to room temperature before serving for best flavor and texture.
Freezer (Up to 3 Months)
- Wrap individual slices or the whole cake tightly in two layers of plastic wrap and one layer of foil.
- Label with the date and freeze.
- Thaw overnight in the fridge or at room temperature before serving.
Fresh, moist, and flavorful—just the way a pound cake should be.
FAQs
1. Can I use bottled lemon juice instead of fresh?
Fresh lemon juice gives a brighter, more natural flavor, but bottled juice can work in a pinch. Be sure to use one with no added sugar or preservatives. For the best results, pair bottled juice with fresh zest to boost the citrus flavor.
2. Why is my pound cake dense or gummy in the center?
This often happens when the flour is overmixed or the oven temperature is too low. Always mix the dry ingredients just until combined and check that your oven reaches the correct temperature before baking. Also, make sure to use room temperature ingredients.
3. Can I make this cake in loaf pans instead of a bundt pan?
Yes, you can divide the batter into two 9×5-inch loaf pans. Reduce the baking time to around 50–60 minutes and start checking for doneness with a toothpick at the 50-minute mark.
4. What kind of cream cheese works best?
Use full-fat block cream cheese, not the spreadable kind in tubs. The block version gives a richer texture and better structure. Let it soften at room temperature before using for smooth mixing.
5. Can I add a glaze or frosting to this cake?
Absolutely. A simple lemon glaze made with powdered sugar and fresh lemon juice works beautifully. You can also dust the top with powdered sugar or serve with whipped cream or berries for a more decadent touch.
Conclusion
Lemon cream cheese pound cake brings together bold citrus flavor and velvety richness in every bite. The smooth, dense crumb and tangy lemon zing make it a standout for any occasion—afternoon tea, holiday desserts, or just a quiet moment with coffee. This cake stays moist for days, slices like a dream, and never fails to impress. Stick with fresh ingredients, don’t rush the mixing process, and you’ll have a bakery-quality cake right from your kitchen. Once you taste it, one slice won’t feel like enough.
Related Recipes
- Miniature Cheesecake Recipe: Bite-Sized Bliss in Every Bite
- Lemon Blueberry Cream Cheese Coffee Cake: A Bright Bite of Sweet Morning Joy
- Cherry Cheesecake Dump Cake: A Simple Yet Irresistible Dessert
Hi there, I’m Preppy Hartwell, but you can call me Preppy—the apron-clad foodie behind Preppy Kitchen Tips! I created Preppy Kitchen Tips because I’m convinced food has a way of telling stories that words can’t. So, grab a fork and dig in. The past never tasted so good!